Payload CMS E-commerce template
1. Login and Account Creation
Section titled “1. Login and Account Creation”To access the Payload CMS admin panel, open the following URL in your web browser:
Admin Panel: https://yourdomain.com/admin
Create Your Account
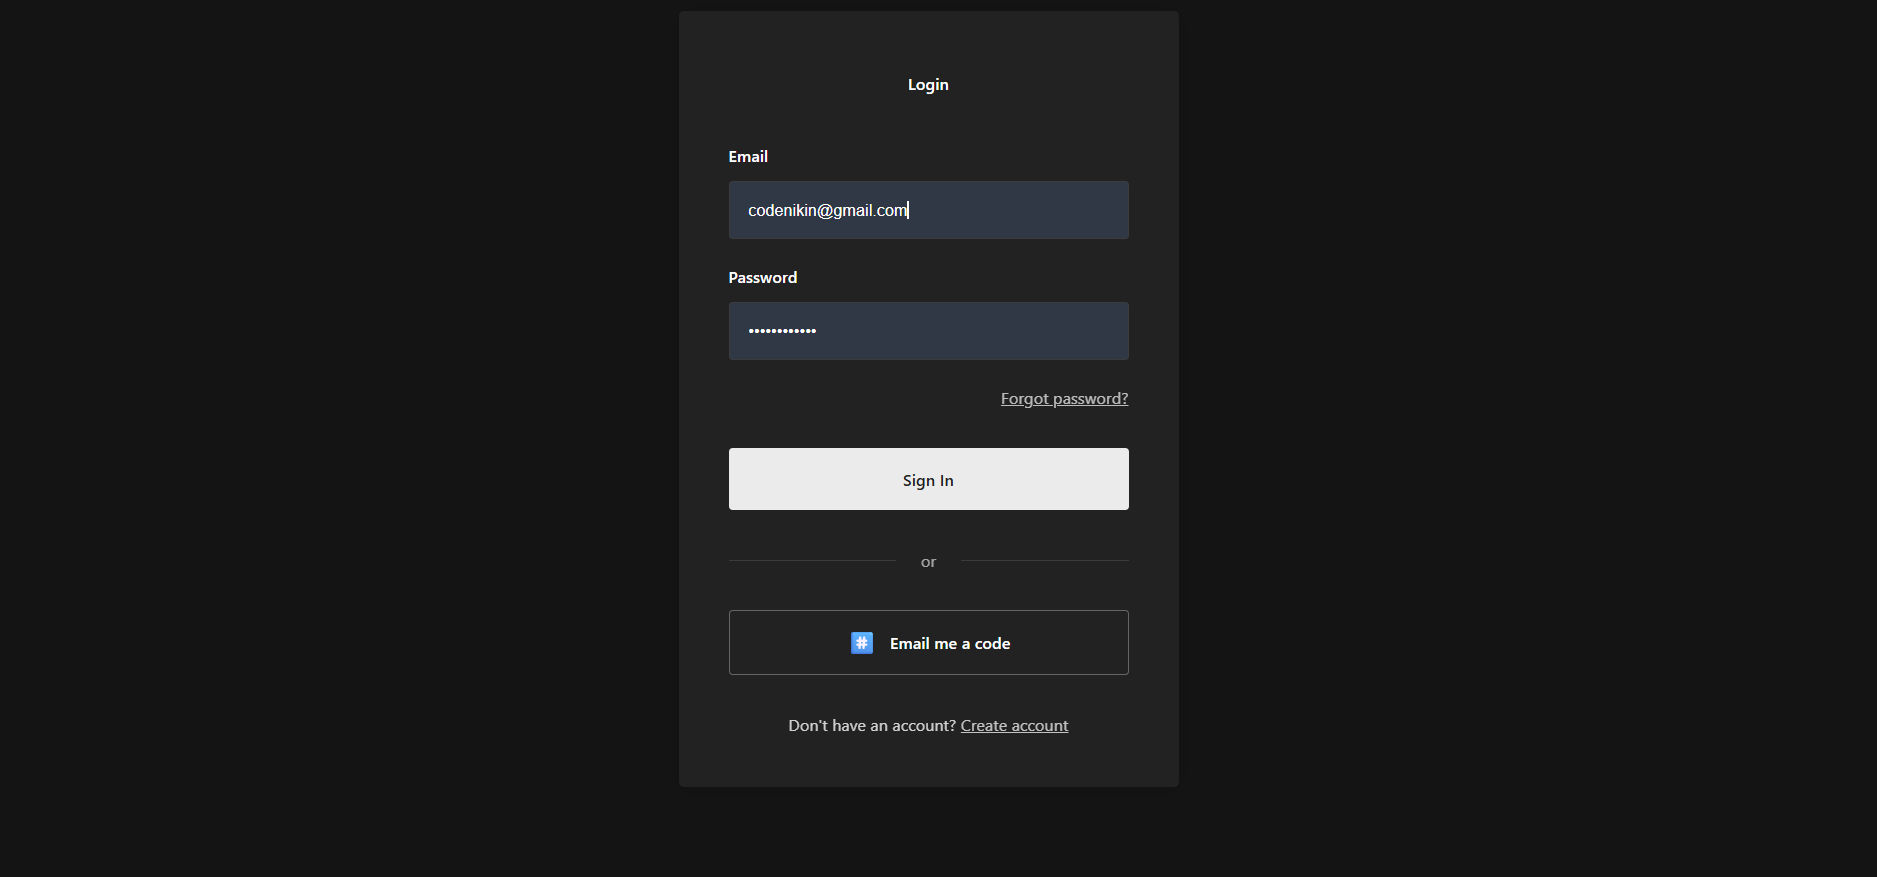
Section titled “Create Your Account”When you open the admin URL for the first time, the Login screen will appear.
If no user account has been created yet, select Create Account to register the first user.
Enter the following details:
- Username / Email: Enter your email address or username.
- Password: Create a secure password.
- Confirm Password: Re-enter your password if required.
After entering the required information, click Create Account.
Super Admin Access
Section titled “Super Admin Access”The first user account created in the Payload CMS admin panel is automatically assigned the Super Admin role.
The Super Admin has full access to the CMS, including managing users, products, orders, settings, and other administrative features.
Important: Make sure the first account is created using the credentials of the person who will manage the website, as this account will have the highest level of access.
Note: The first user typically has full administrative privileges and can create additional users and manage roles.
2: Seed Demo Data
Section titled “2: Seed Demo Data”After logging in to the Payload CMS admin panel for the first time, you can quickly populate your website with demo data using the built-in seed feature.
How to Seed Demo Data
Section titled “How to Seed Demo Data”- Log in to the Payload CMS Admin Panel.
- Click the Seed button.
- Wait while the system processes and imports the demo data.
- Once the process is complete, your demo content will be available on the website.
- Visit your website to view the seeded demo content.
The seed process allows you to set up the template quickly without manually creating products, categories, users, or other sample content.
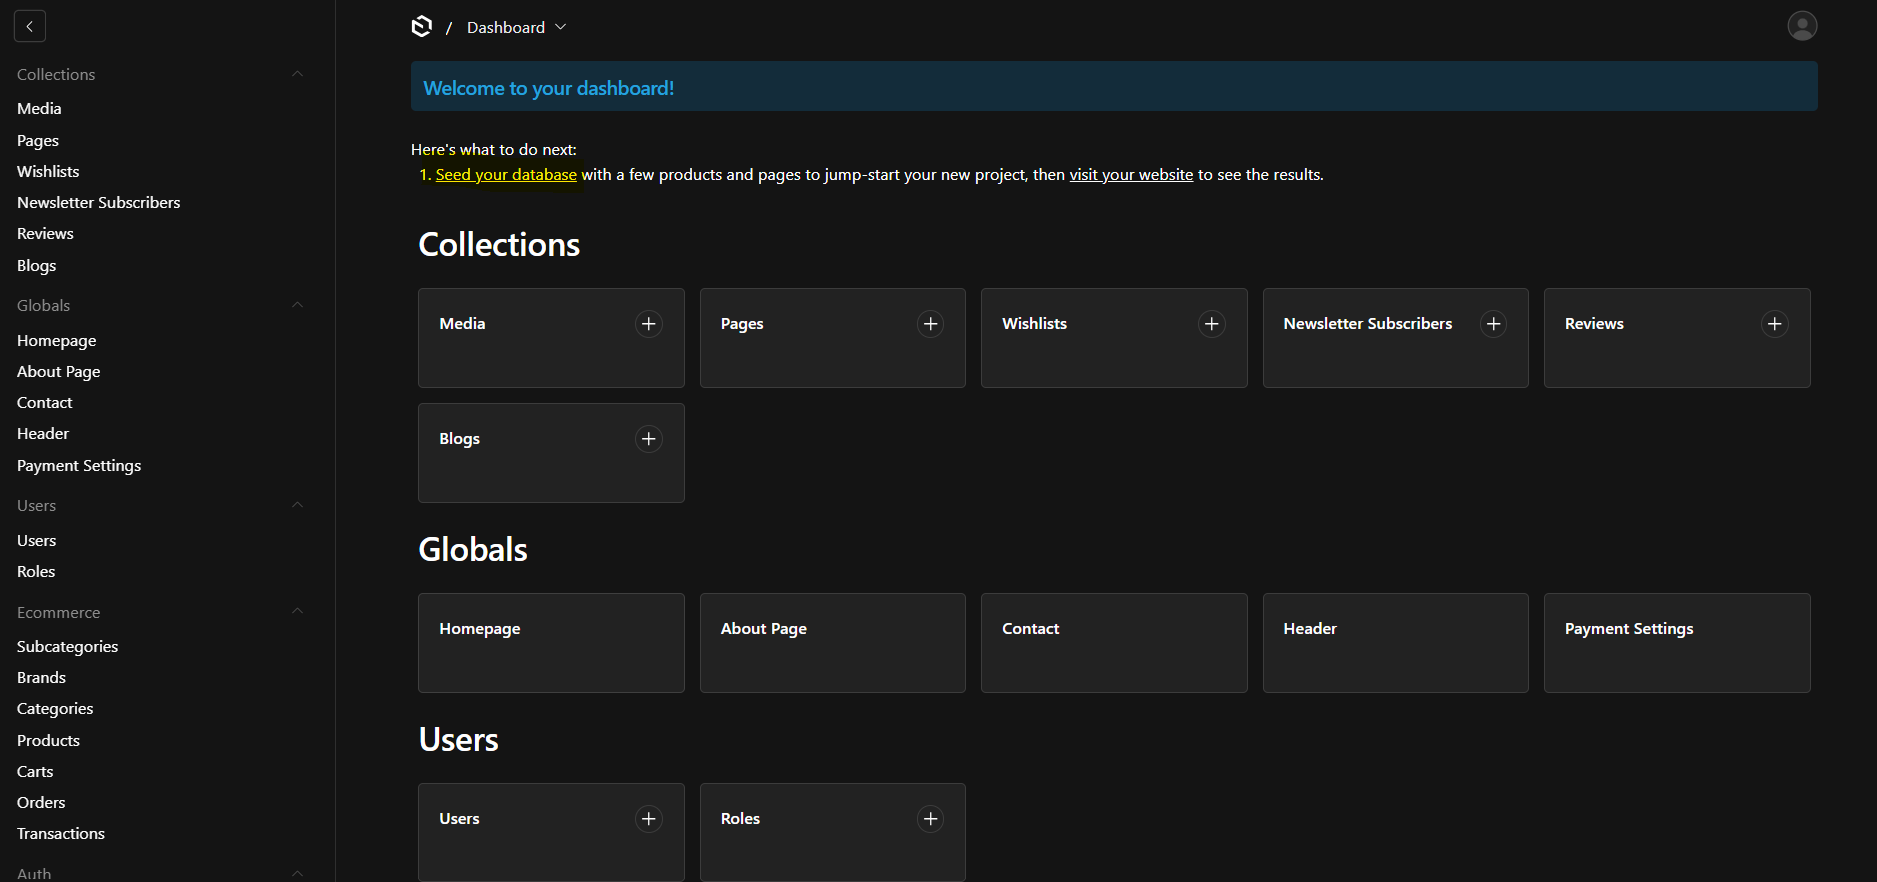
Note: The seeded content is provided for demonstration purposes only. You can modify, replace, or delete the demo data at any time and customize the website according to your requirements.
3. Reusable Page Blocks
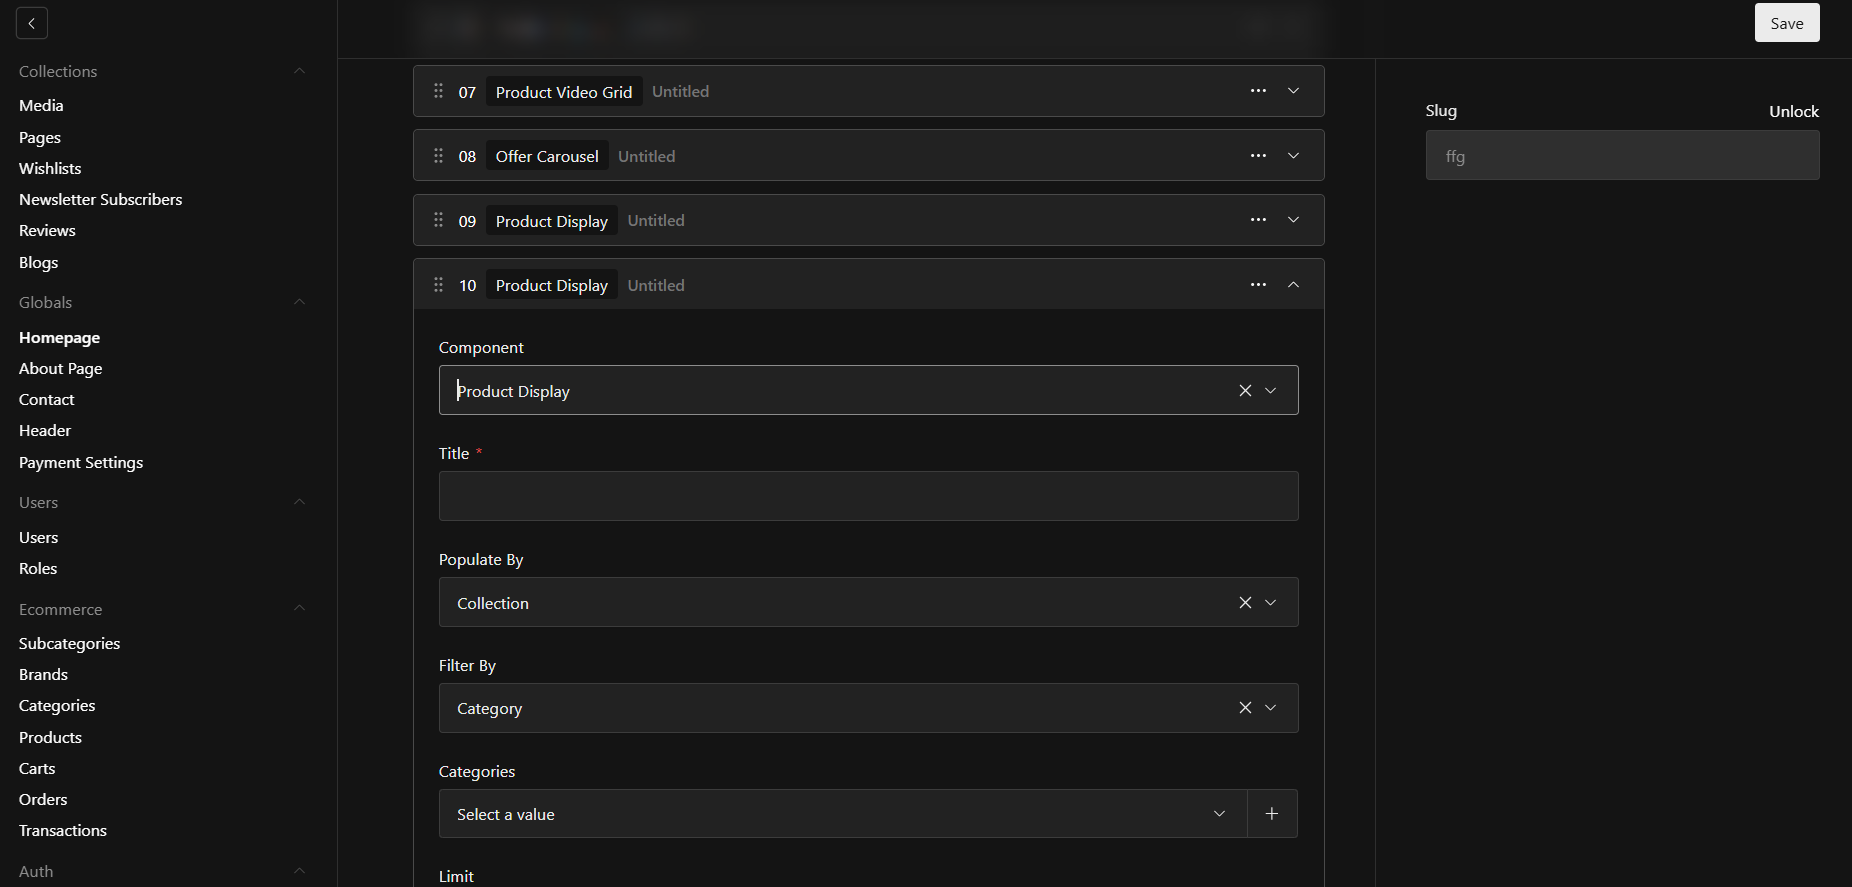
Section titled “3. Reusable Page Blocks”The homepage is built using reusable content blocks, giving you complete flexibility to create and customize your storefront layout directly from the Payload CMS dashboard—without modifying the code.
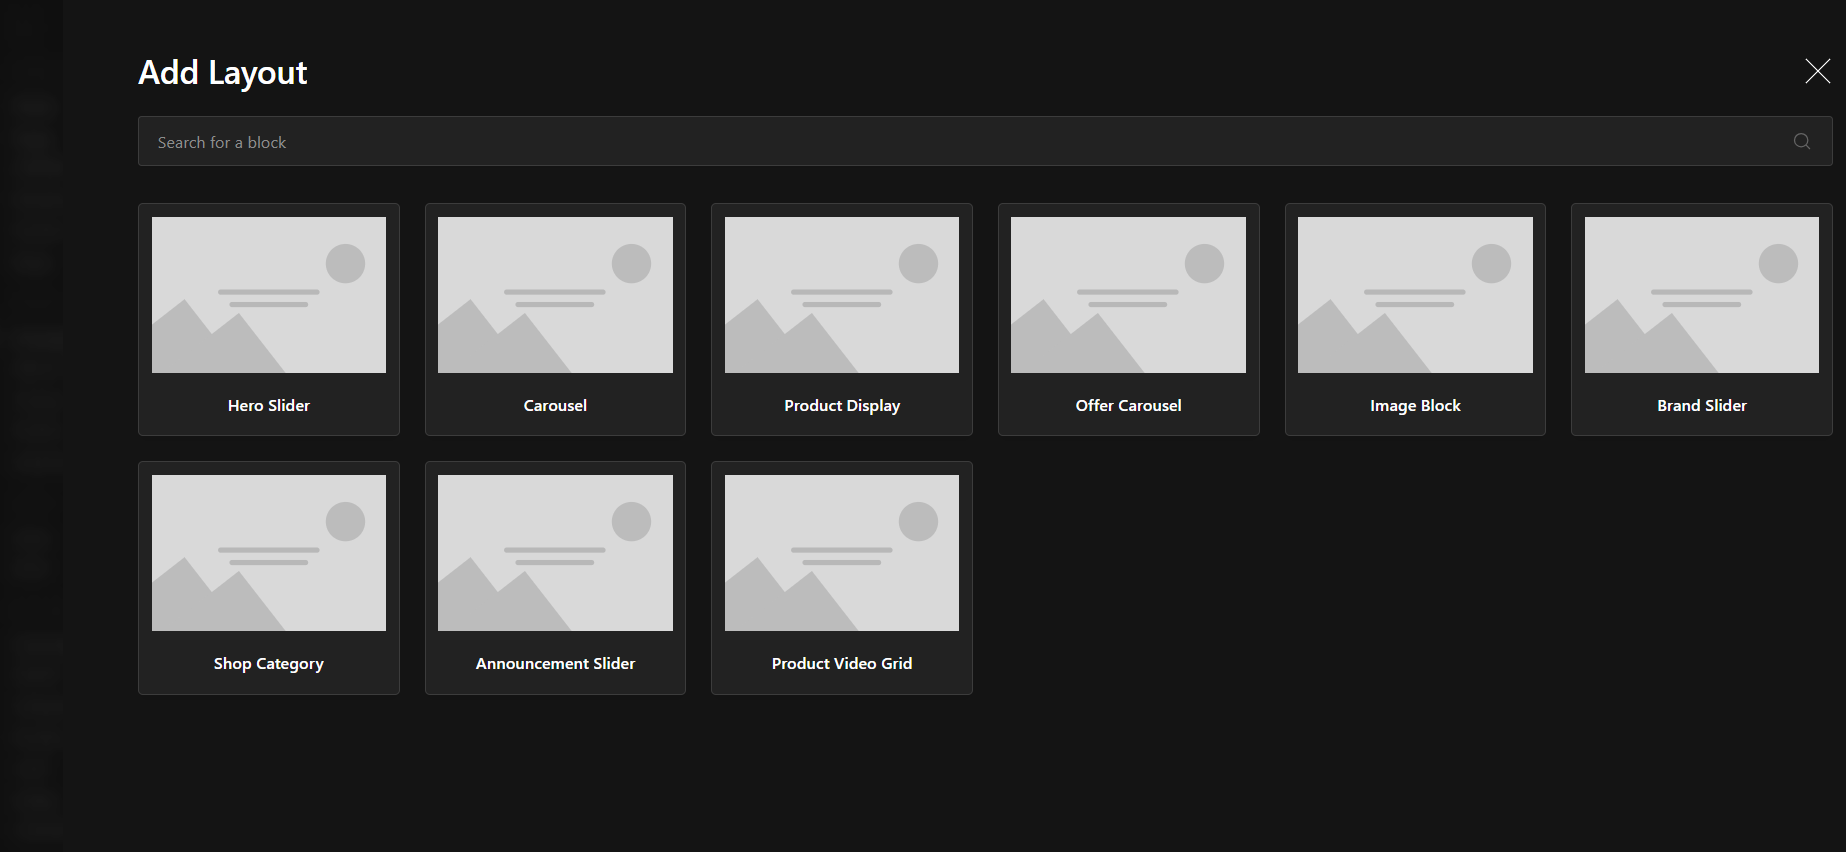
The system currently includes 9 pre-built blocks, including:
- Banner Block – Display promotional banners, campaigns, and featured content.
- Image Block – Add images and visual content to different sections of the homepage.
- Product Display Block – Showcase products dynamically based on categories or brands.
- Brand Slider Block – Display your brands in an attractive, responsive slider.
- Additional Layout Blocks – Create flexible page sections and arrange content according to your requirements.
Add and Reorder Blocks
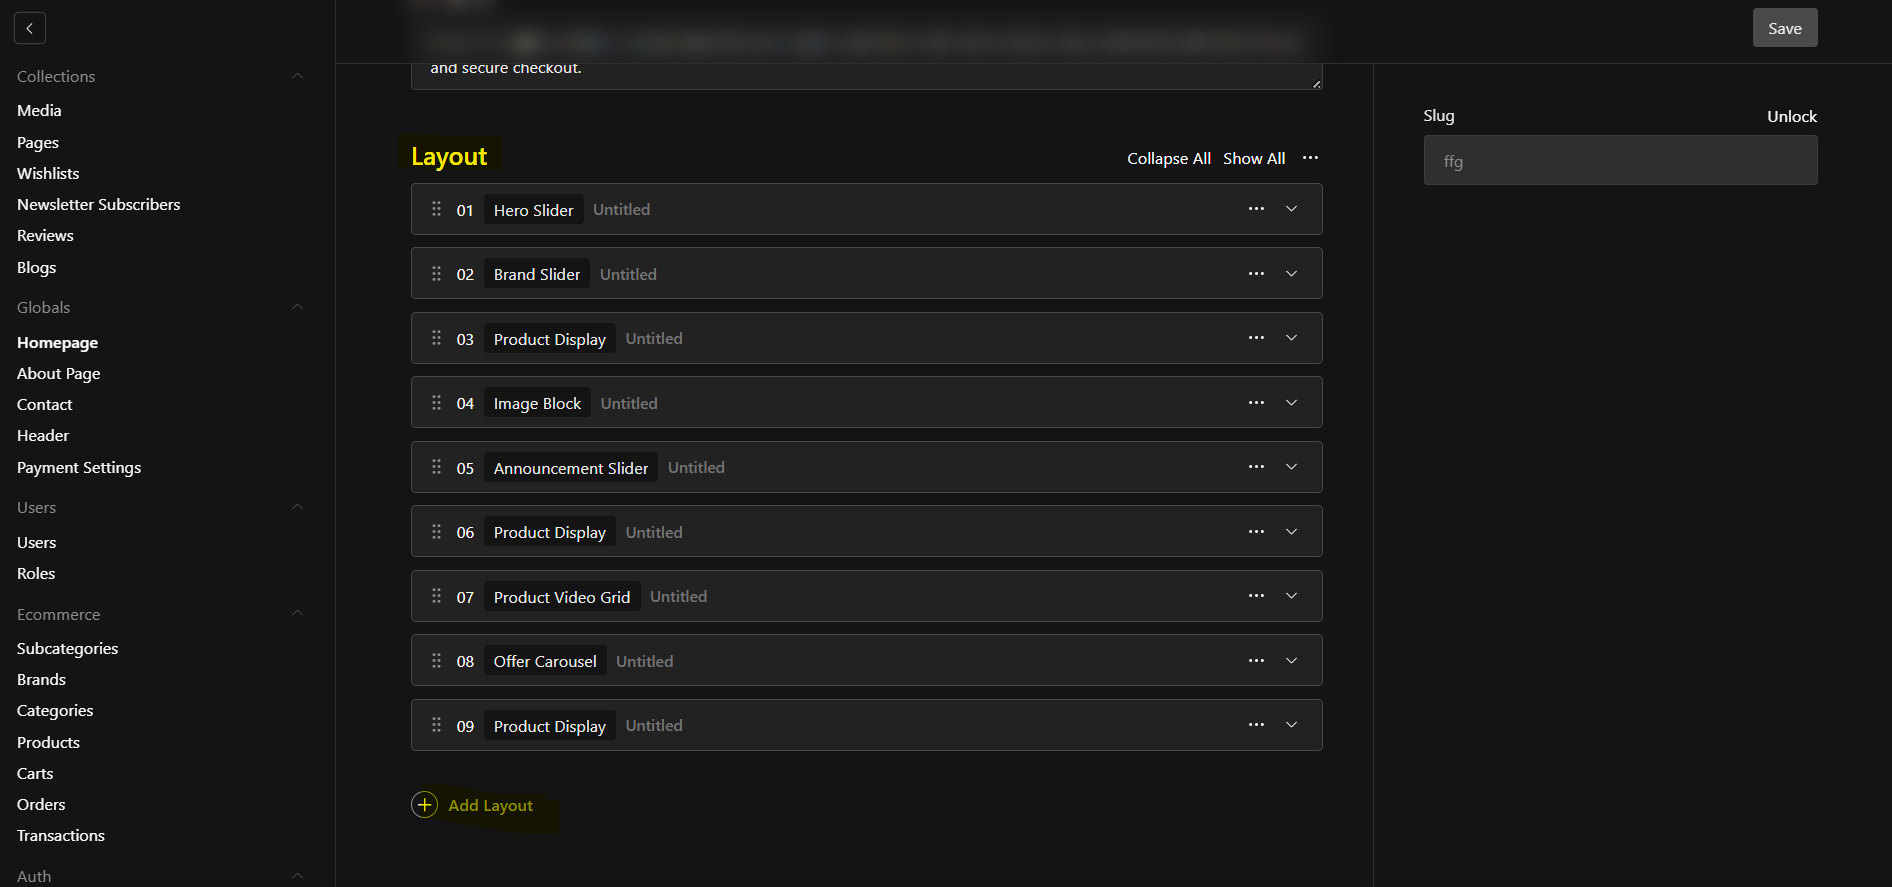
Section titled “Add and Reorder Blocks”You can easily add, configure, and reorder blocks from the Payload CMS dashboard.
To customize your homepage:
- Open the Homepage from the Payload CMS admin panel.
- Add a new block from the available block types.
- Configure the block settings and content.
- Position the block anywhere on the page.
- Drag and reorder blocks to create your preferred page structure.
- Click Save to apply your changes.
This flexible block-based system allows you to build and customize your homepage without any coding knowledge.
Product Groups
Section titled “Product Groups”The Product Display Block allows you to dynamically create product sections based on your store’s catalog.
You can display products by:
- Category – Show products from a specific category.
- Brand – Show products belonging to a specific brand.
For example, you can create sections such as:
- Featured Products
- New Arrivals
- Men’s Collection
- Women’s Collection
- Nike Products
- Best Sellers
This makes it easy to create targeted product sections and keep your homepage content up to date.
Product Grid Layout
Section titled “Product Grid Layout”The Product Display Block also includes flexible grid options that allow you to control how many products are displayed in each row.
You can select a grid layout from 3 to 6 columns directly from the dashboard:
- 3 Columns – Larger product cards with more visual emphasis.
- 4 Columns – A balanced layout suitable for most storefronts.
- 5 Columns – Display more products while maintaining a clean layout.
- 6 Columns – A compact layout for showcasing a larger number of products.
Simply select your preferred column count from the dashboard and save your changes. The storefront will automatically update to reflect your selected layout.
Product Grid Styles
Section titled “Product Grid Styles”In addition to controlling the number of columns, the Product Display Block includes 3 different product grid styles.
You can select the style that best matches your website’s design and branding directly from the CMS dashboard.
Each style provides a different visual presentation for your product cards, allowing you to create a more unique and engaging storefront.
To change the product grid style:
- Open the Product Display Block in the Payload CMS dashboard.
- Select your preferred Product Grid Style.
- Choose the desired Grid Layout from 3 to 6 columns.
- Save your changes.
- Visit the storefront to see the updated product section.
You can combine the product group, grid style, and column layout settings to create different product sections throughout your homepage.
Tip: Experiment with different product grid styles and column layouts to find the best presentation for your products and overall storefront design.
The dashboard provides access to all available modules and features based on your assigned role and permissions. From here, you can navigate through different sections of the system using the sidebar menu.
4 Creating Products
Section titled “4 Creating Products”Assigning Category, Subcategory, and Brand
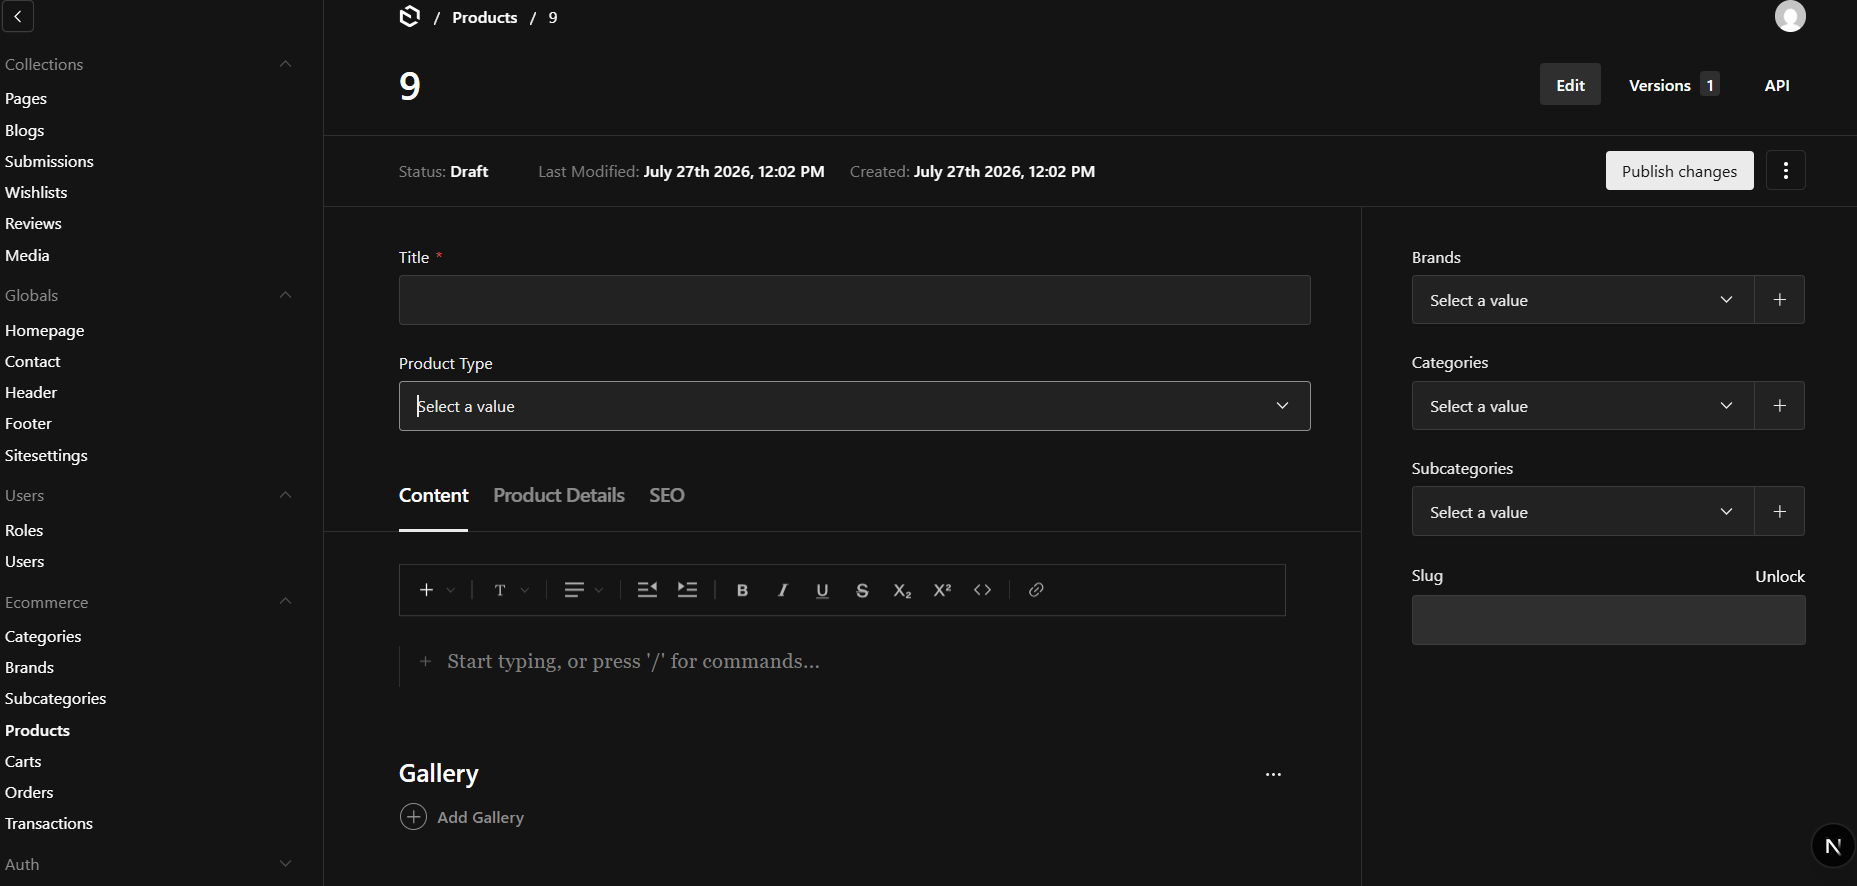
Every product in PayloadCommerce must be organised using a Category, Subcategory, and Brand. Properly assigning these relationships helps customers find products more easily, improves website navigation, and ensures accurate filtering throughout your store.
Important: Before creating a product, make sure you have already created the required Categories, Subcategories, and Brands in the admin panel.
Understanding the Relationship
Products follow the hierarchy below:
Category│├── Subcategory│└── Brand(s) │ └── ProductWhen setting up your ecommerce store for the first time, follow this order:
Create Categories │ ▼Assign Brands to Categories │ ▼Create Subcategories under Categories │ ▼Create ProductsThe Products collection is one of the most important sections of PayloadCommerce. It allows you to create and manage all the products available in your online store. Each product can include detailed information such as pricing, images, inventory, categories, variants, SEO settings, and more. To create a new product:
Log in to the Payload CMS Admin Panel
From the left navigation menu
click Products
Click Create New
Complete all the required product information.
Click Save or Publish.
5 Creating Categories
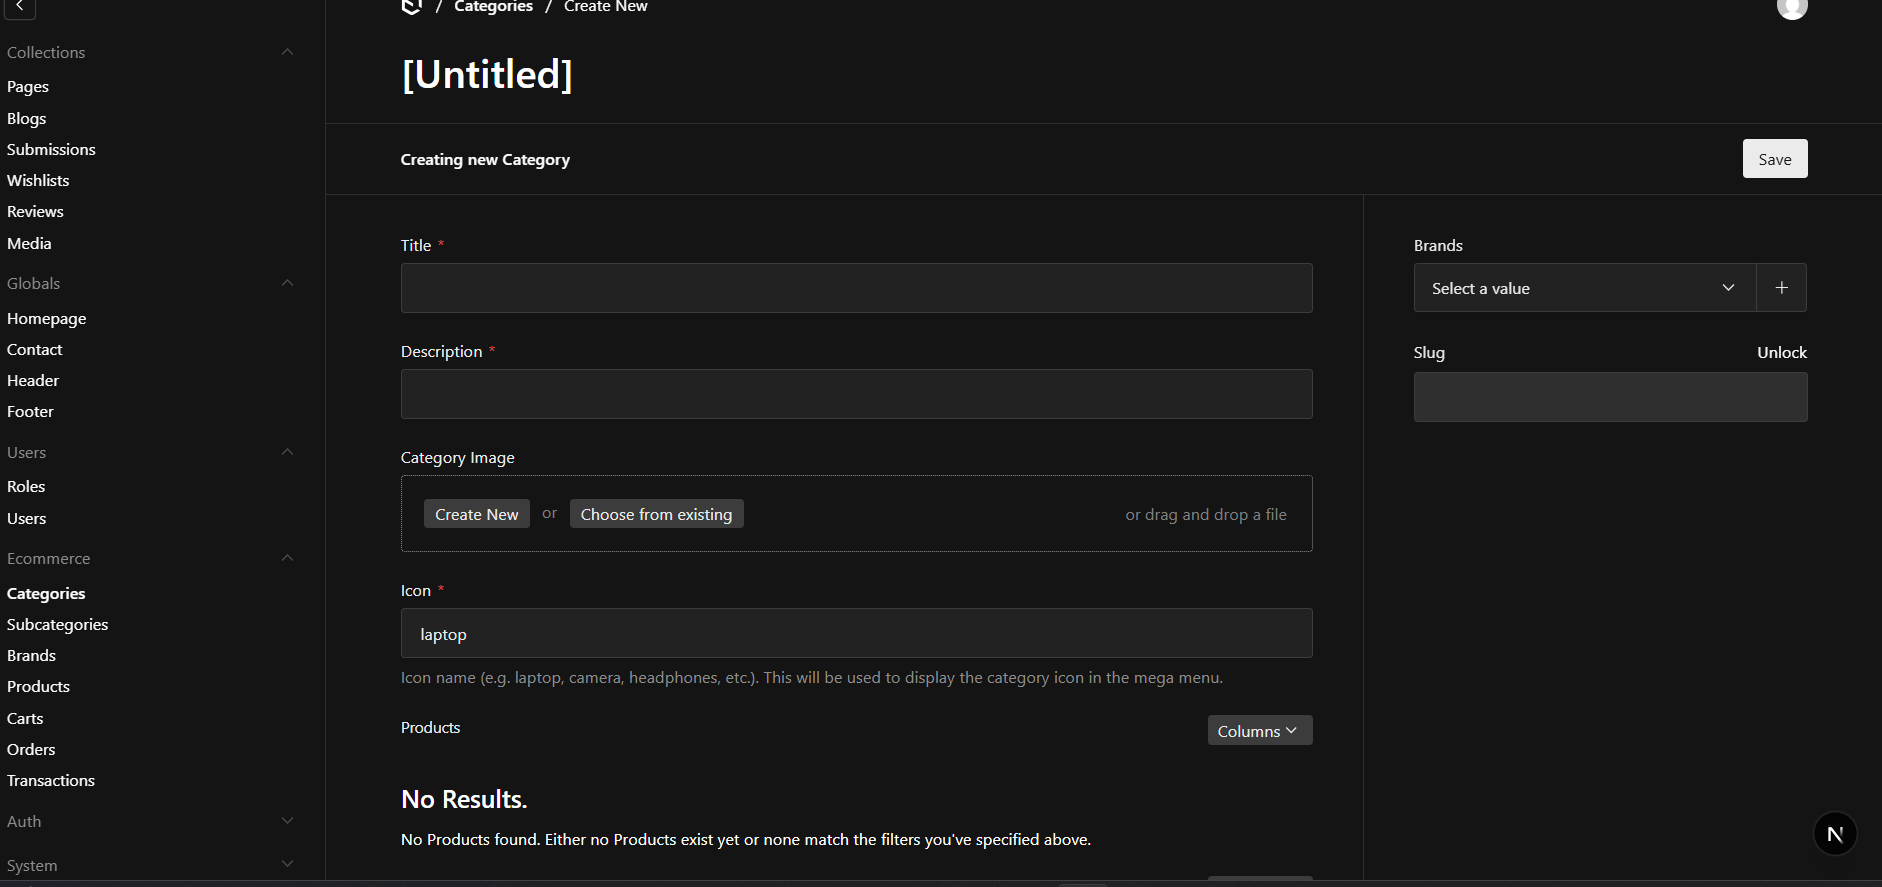
Section titled “5 Creating Categories”Categories help organise products into logical groups, making it easier for customers to browse your store.
To create a category:
→ Log in to the Payload CMS Admin Panel.
→ Navigate to Categories.
→ Click Create New.
→ Complete the required information.
→ Click Save or Publish.
6: User Roles & Permissions
Section titled “6: User Roles & Permissions”PayloadCommerce includes a flexible Role-Based Access Control (RBAC) system that allows administrators to control what each user can view and manage within the admin panel.
Instead of giving every administrator full access, you can create custom roles with specific permissions and assign them to individual users.
This helps protect sensitive data while ensuring each team member has access only to the features they need. How Roles Work
The permission system consists of three simple steps:
Create Role │ ▼Configure Permissions │ ▼Assign Role to UserOnce a role is assigned, the user’s permissions are automatically applied when they sign in. Example Roles
The following examples show common role configurations.
Example Role Structure
Section titled “Example Role Structure”If you create a role with the slug super-admin, that role is automatically recognised as the Super Administrator role.
Users assigned to this role bypass all permission checks and are granted unrestricted access to the entire administration panel, regardless of the permissions configured for the role.
👑 Super Administrator├── Full access to all collections├── Full access to all global settings└── Can manage users and roles
🛍️ Store Manager├── Products├── Categories├── Subcategories├── Brands├── Orders├── Coupons└── Customers
📝 Content Manager├── Products├── Categories├── Subcategories├── Brands├── Pages├── Blogs└── Media
📦 Order Manager├── Orders├── Customers└── Order Status Updates
📢 Marketing Manager├── Products├── Categories├── Brands├── Home Page├── Landing Pages├── Banners├── Coupons└── Blog Posts
7. Google SEO & Search Engine Optimization
Section titled “7. Google SEO & Search Engine Optimization”SEO is essential for any ecommerce website, especially when you want your products and categories to be discovered through Google Search.
This ecommerce template includes a comprehensive SEO system designed to make your store more search-engine friendly with dynamic sitemaps, metadata, structured data, and Google Analytics integration.
Dynamic XML Sitemaps
Section titled “Dynamic XML Sitemaps”The system automatically generates dynamic XML sitemaps for your website. These sitemaps are automatically updated based on your website content, including products, categories, subcategories, brands, and blog posts.
You can submit the following sitemap URLs to Google Search Console:
-
Product Sitemap
https://yourdomain.com/product-sitemap.xml -
Home/Pages Sitemap
https://yourdomain.com/home-sitemap.xml -
Subcategories Sitemap
https://yourdomain.com/subcategories-sitemap.xml -
Categories Sitemap
https://yourdomain.com/categories-sitemap.xml -
Blog Sitemap
https://yourdomain.com/blog-sitemap.xml -
Brands Sitemap
https://yourdomain.com/brands-sitemap.xml
Important: Replace
yourdomain.comwith your actual website domain before submitting the sitemap URLs to Google Search Console. We recommend opening each sitemap URL in your browser first to verify that it is accessible and contains the expected URLs.
Dynamic SEO Metadata
Section titled “Dynamic SEO Metadata”The template includes dynamic SEO metadata across the website.
SEO information can be generated dynamically for different types of pages, including:
- Product pages
- Category pages
- Subcategory pages
- Brand pages
- Blog pages
- Other website pages
You can manage important SEO elements such as:
- Meta Title
- Meta Description
- Meta Image
You can also manually customize the SEO metadata whenever you want more control over how a specific page appears in search engine results and social sharing previews.
Rich Schema Markup
Section titled “Rich Schema Markup”One of the most powerful SEO features included in the template is Rich Schema Markup.
Structured data is implemented across the website, with special attention given to product pages. This helps search engines better understand your content and product information.
Product structured data can help search engines understand information such as:
- Product name
- Product image
- Product description
- Price
- Availability
- Brand
- Other relevant product information
You can test your pages using Google’s Rich Results Test to verify that the structured data is detected correctly.
Tip: After adding or updating your products, it is recommended to test important product pages using Google’s Rich Results Test and resolve any reported issues.
Google Search Console
Section titled “Google Search Console”After deploying your website, we recommend connecting your website to Google Search Console and submitting the generated XML sitemaps.
This allows Google to discover and crawl your website content more efficiently and provides useful information about your site’s search performance, indexing status, and potential SEO issues.
Google Analytics Integration
Section titled “Google Analytics Integration”The template also includes Google Analytics integration.
You can add your Google Analytics Measurement ID / tracking key directly from the website settings in the Payload CMS dashboard.
Once configured, Google Analytics can be used to monitor important website activity and understand how visitors interact with your ecommerce store.
SEO Features at a Glance
Section titled “SEO Features at a Glance”The ecommerce template includes:
- ✅ Dynamic XML sitemap generation
- ✅ Product sitemap
- ✅ Category sitemap
- ✅ Subcategory sitemap
- ✅ Brand sitemap
- ✅ Blog sitemap
- ✅ Dynamic meta titles
- ✅ Dynamic meta descriptions
- ✅ Dynamic meta images
- ✅ Manual SEO customization
- ✅ Rich Schema Markup
- ✅ Product structured data
- ✅ Google Search Console support
- ✅ Google Analytics integration
Note: SEO performance depends on many factors, including your content quality, site performance, backlinks, competition, and Google’s indexing and ranking algorithms. The template provides the technical SEO foundation, while your content and SEO strategy will determine the long-term search performance of your website.
8: WhatsApp Notifications
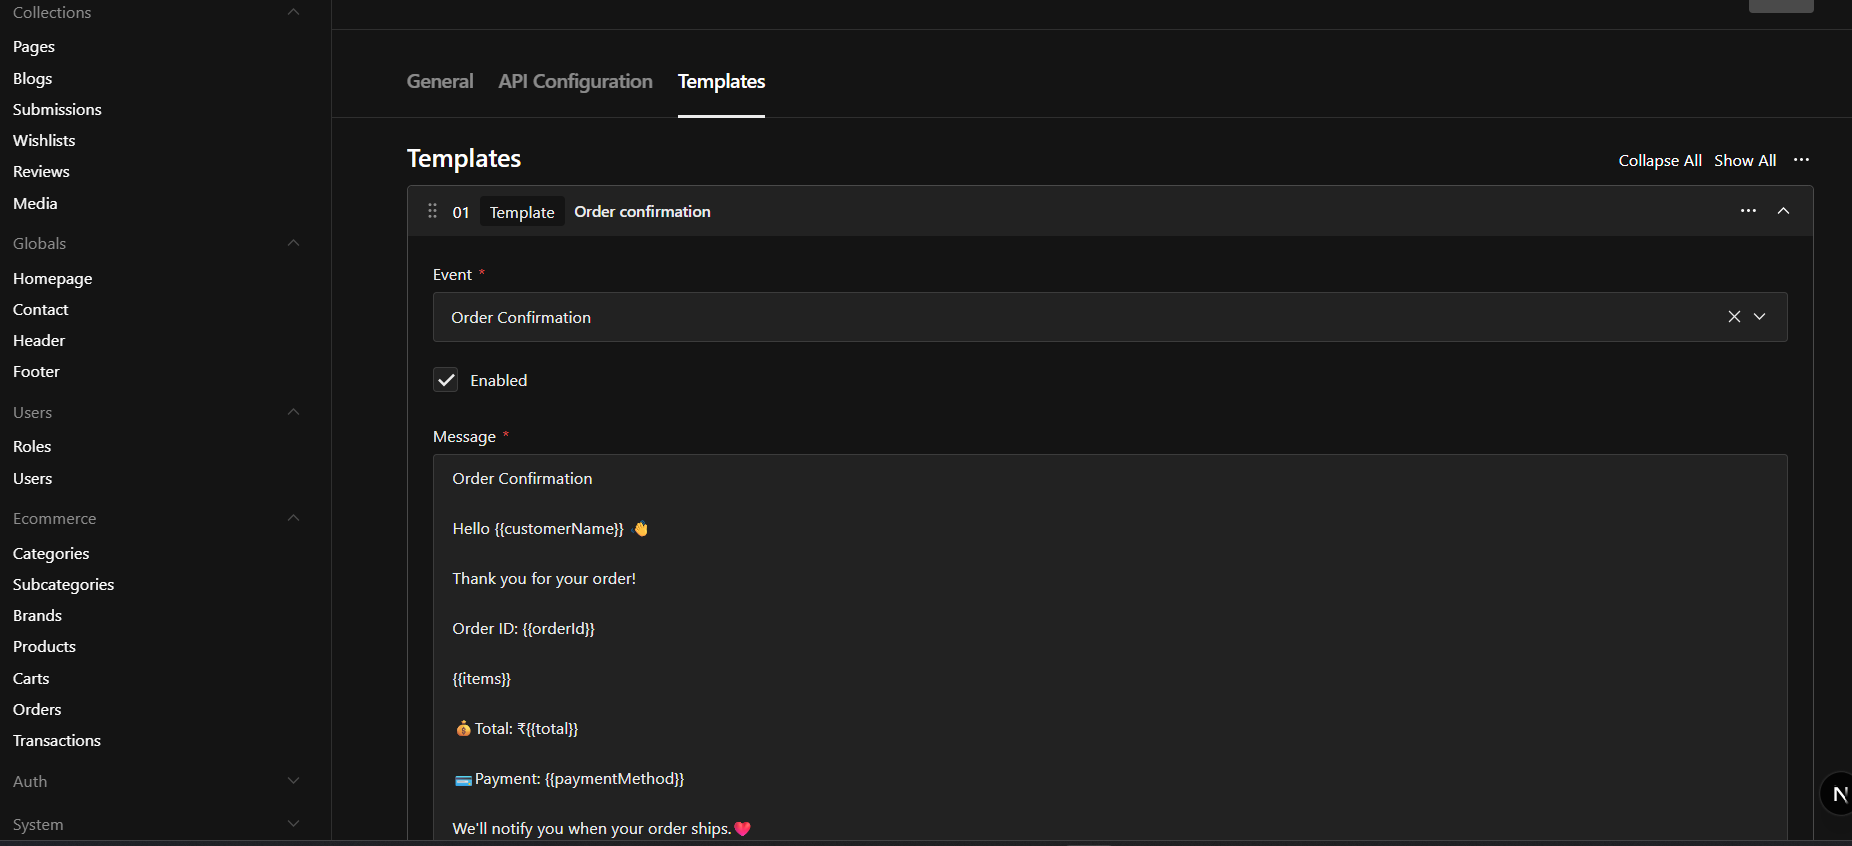
Section titled “8: WhatsApp Notifications”PayloadCommerce includes a built-in WhatsApp notification system that automatically sends messages to customers when important order events occur. The notification system is fully integrated into the ecommerce workflow and requires no additional development once configured. One of the key advantages is that all WhatsApp message templates can be customised directly from the admin dashboard, allowing you to tailor messages to match your brand and communication style. How It Works When an order event occurs, PayloadCommerce automatically processes the event and sends a WhatsApp message to the customer.
Customer Places Order │ ▼Order Event Triggered │ ▼Load WhatsApp Template │ ▼Replace Dynamic Variables │ ▼Send WhatsApp Message │ ▼Managing WhatsApp Templates
Navigate to:
Admin Panel │ └── Globals │ └── WhatsApp SettingsFrom the WhatsApp Settings page, you can:
Enable or disable WhatsApp notifications.
Configure your WhatsApp API provider.
Edit notification templates.
Test message delivery.
Update sender information.
Manage API credentials.
Customer Receives Notification
9: E-mail Template
Section titled “9: E-mail Template”In addition, we provide professionally designed email templates for booking confirmations and password reset notifications. These templates can be fully customized from the admin dashboard, allowing you to update the content and tailor the CSS to match your brand.
10: Authentication & Security
Section titled “10: Authentication & Security”PayloadCommerce includes a modern authentication system designed to protect both customers and administrators. Built-in security features help safeguard user accounts while providing a smooth login experience.
The authentication system supports secure customer accounts, administrator protection, email verification, password recovery, and optional two-factor authentication. Customer Authentication
Customers can securely manage their accounts using the built-in authentication system.
Features include:
✅ User Registration
✅ Secure Login
✅ Email Verification
✅ Forgot Password
✅ Password Reset
✅ Two-Factor Authentication (2FA)
✅ Account Management
Two-Factor Authentication (2FA)
For additional account security, customers can enable Two-Factor Authentication (2FA) directly from their account dashboard.
Navigate to:
My Account
│ └── Security Settings │ └── Two-Factor AuthenticationCustomers can:
Enable Two-Factor Authentication Disable Two-Factor Authentication Secure their account with an additional verification step Manage their security preferences at any time
Once enabled, an additional verification code is required during login, providing an extra layer of protection against unauthorised access. Enabling Two-Factor Authentication (2FA)
Two-Factor Authentication (2FA) provides an additional layer of security for your administrator account. Once enabled, you’ll need both your password and a time-based verification code from an authenticator app to sign in.
Step 1 – Open Security Settings
Navigate to your account’s Security Settings and locate the Two-Factor Authentication section.
Enter your current administrator password to verify your identity, then click Enable Two-Factor Authentication.
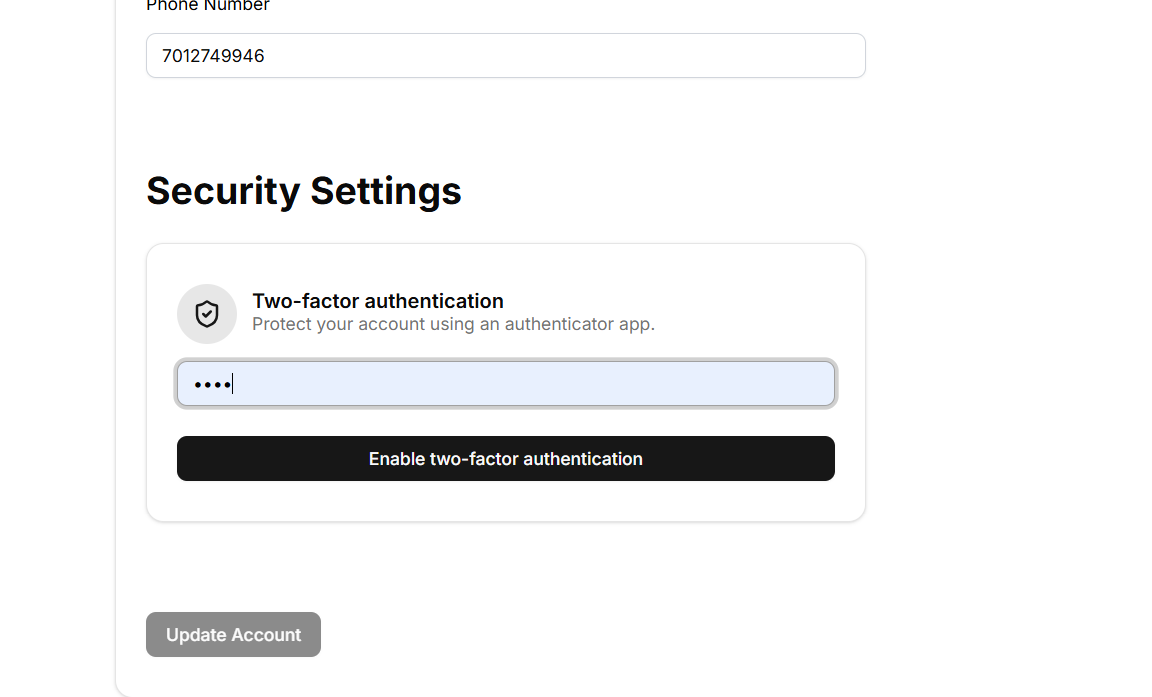
My Account
│ └── Security │ └── Enter dashboard admin password │ └── Enable Two-Factor AuthenticationStep 2 – Scan the QR Code
After clicking Enable Two-Factor Authentication, the system generates a unique QR code for your account.
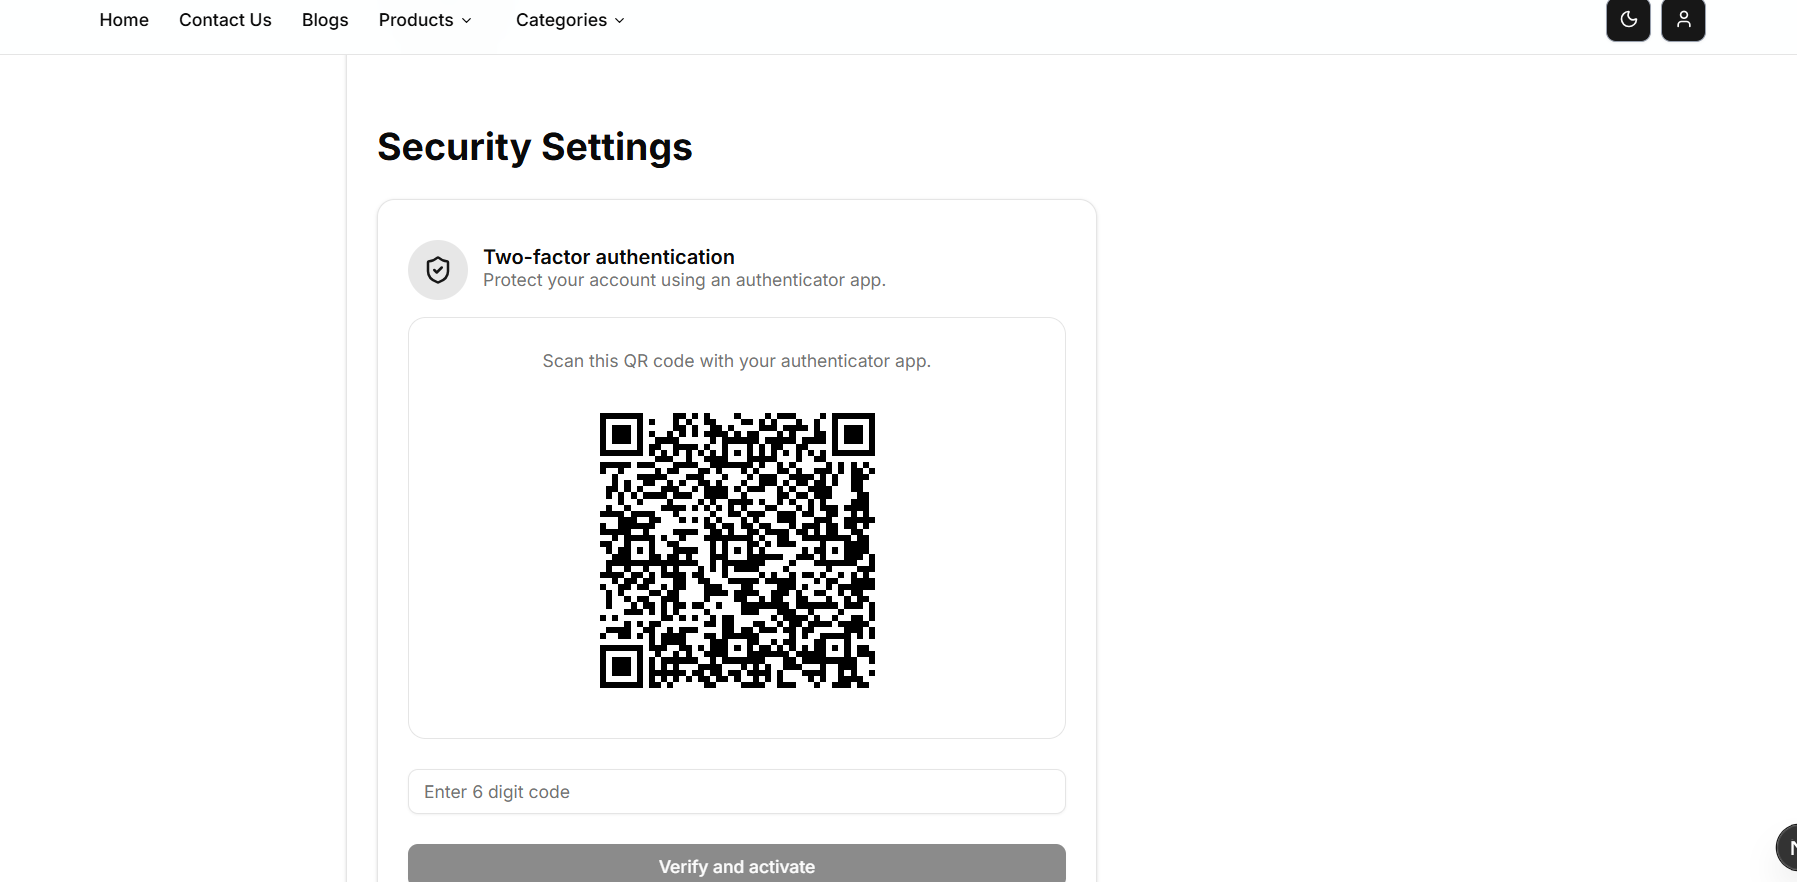
Step 2 – Scan the QR Code
After clicking Enable Two-Factor Authentication, the system generates a unique QR code for your account. Step 3 – Install an Authenticator App
Install an authenticator application on your mobile device if you don’t already have one.
We recommend:
Microsoft Authenticator Google Authenticator Authy 1Password (Authenticator)
For Microsoft Authenticator, download it from the official app stores:
Download: Android: Microsoft Authenticator
Download: I-phone: Microsoft Authenticator
Step 4 – Scan the QR Code
Open your authenticator app and choose Add Account or Scan QR Code.
Scan the QR code displayed on the screen.
The app will automatically create a new account and begin generating 6-digit verification codes that refresh every 30 seconds.
Step 5 – Verify the Code
Enter the current 6-digit verification code displayed in your authenticator app.
Click Verify or Confirm.
If the code is correct, Two-Factor Authentication will be enabled successfully.
11: Payment Methods
Section titled “11: Payment Methods”PayloadCommerce includes a flexible and extensible payment system that supports multiple payment gateways out of the box while allowing additional gateways to be integrated as your business grows.
The platform is designed to provide a seamless checkout experience for customers, whether they prefer online payments or offline payment methods.
Supported Payment Methods
Section titled “Supported Payment Methods”PayloadCommerce currently includes support for the following payment methods:
- Stripe – Secure online payments with support for credit cards, debit cards, and digital wallets.
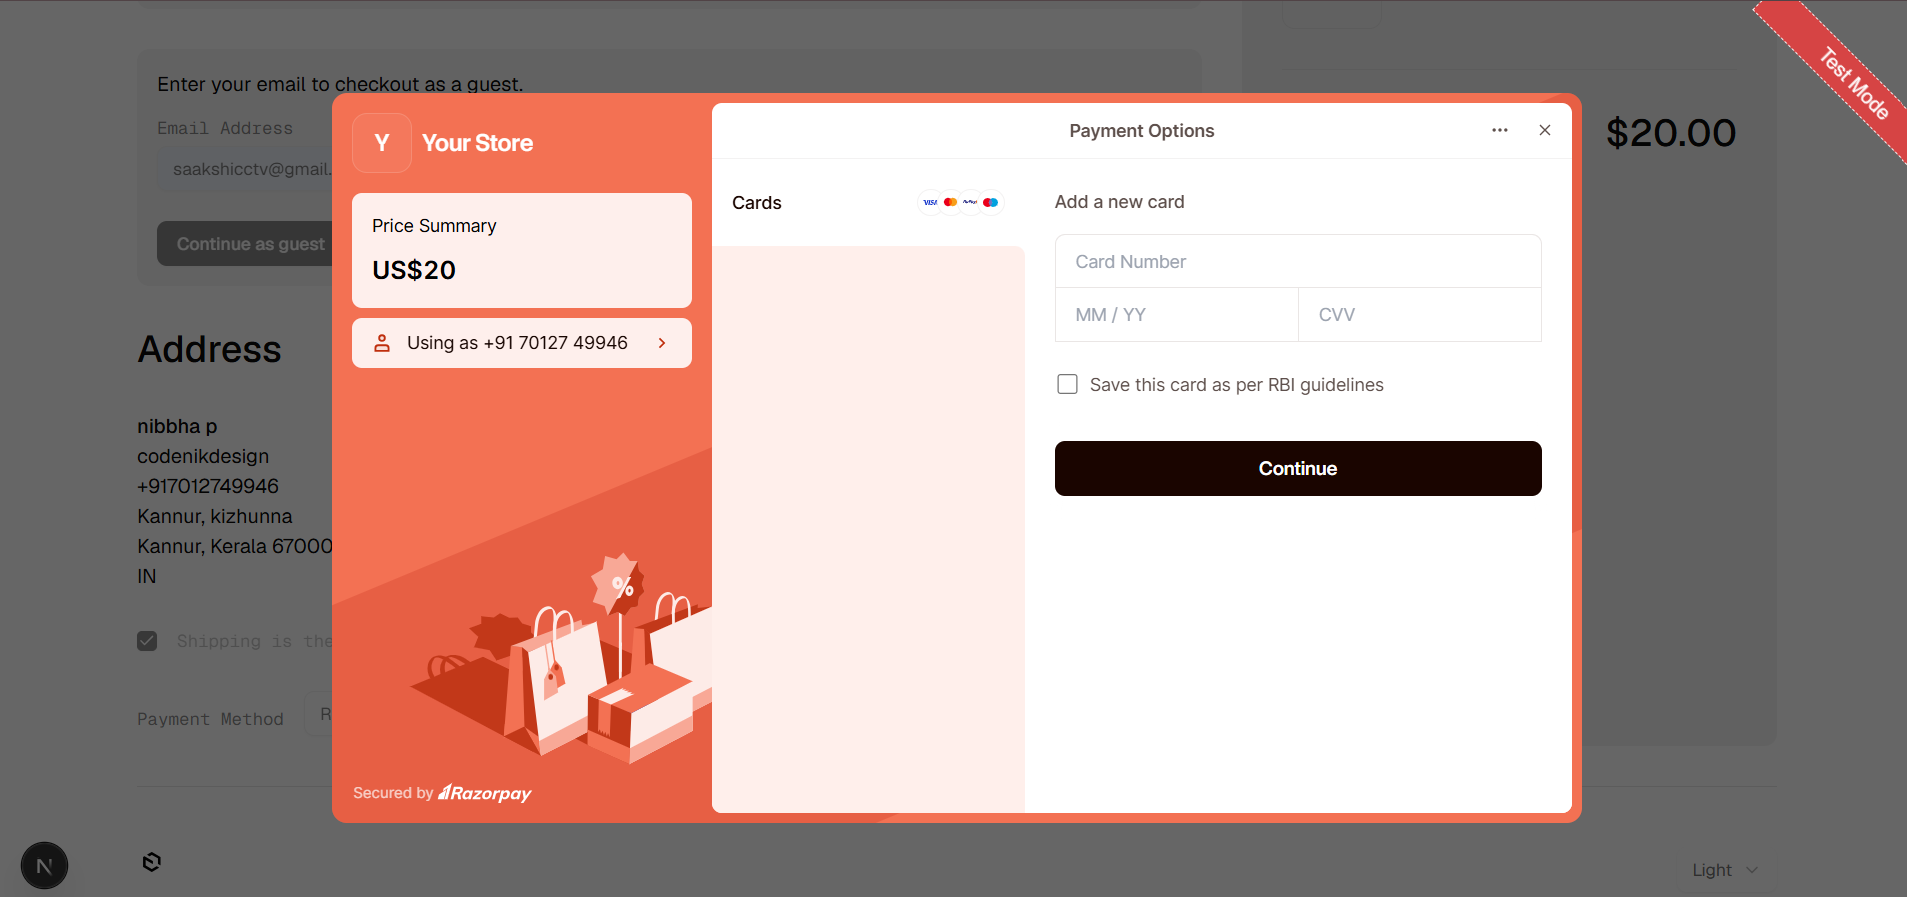
- Razorpay – Popular payment gateway for Indian businesses with support for UPI, cards, net banking, and wallets.
- Cash on Delivery (COD) – Allow customers to pay when their order is delivered.
Payment Gateway Architecture
Section titled “Payment Gateway Architecture”The payment system is fully modular, making it easy to add or replace payment providers.
Customer Checkout │ ▼Select Payment Method │ ├── Stripe ├── Razorpay └── Cash on Delivery │ ▼Process Payment │ ▼Create Order │ ▼Payment ConfirmationConfigure Payment Gateways
Section titled “Configure Payment Gateways”Navigate to:
Admin Panel │ └── Globals │ └── Payment SettingsFrom the Payment Settings page, you can:
- Enable or disable payment methods.
- Configure API credentials.
- Switch between test and live environments.
- Set gateway-specific options.
- Manage payment provider settings.
Custom Payment Gateway Integration
Section titled “Custom Payment Gateway Integration”In addition to the built-in payment providers, PayloadCommerce supports custom payment gateway integration.
If your business requires a different provider, developers can integrate virtually any payment gateway that provides an API.
Examples include:
- PayPal
- PayU
- PhonePe
- Cashfree
- Square
- Authorize.Net
- Mollie
- Adyen
- Worldpay
- Any custom or regional payment gateway
The modular payment architecture makes it straightforward to extend the platform without affecting the existing checkout process.
Benefits
Section titled “Benefits”- Multiple payment methods available out of the box.
- Easy configuration through the admin dashboard.
- Support for both online and offline payments.
- Secure payment processing.
- Modular architecture for future integrations.
- Scalable solution for businesses operating in different regions.
Note: Stripe, Razorpay, and Cash on Delivery are included by default. Additional payment gateways can be integrated through custom development to meet your specific business or regional requirements.
Note: Installation and initial setup are currently included at no additional cost. Our team will configure the application and ensure everything is working correctly before handover.